Thursday, October 22, 2015
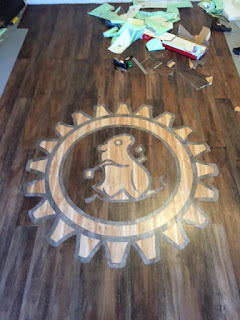
My Garage floor!
We've had a house since January and our improvement projects haven't ceased! They've been slow, surely, but we've been working on several things at once to keep things interesting. I'm most excited about the vision I have for my garage. I want a sort of trendy clean old barn feel. I want stone verneer on all the walls separated by 6" wide beams of aged wood. The ceiling will be covered in aged thin wood slats and the floor, as you can see will be vinyl wood slat flooring. This will keep the cost down, look just like real wood, be water and temperature proof, and finally not be destroyed by a 1,000lbs. vintage VW or Porsche. In dreaming up my floor, I envisioned a 5 ft. diameter freelance logo that would simulate wood inlay. I finally finished that exact thing last night and it's EXACTLY what I envisioned! It took about 20-30 hours spread out from September 14th till October 21st.
Sunday, August 30, 2015
My first foray into Rhino 5
This is my first little tutorial lesson in Rhino 5. My next step is to import this as an .obj file into Blender and render it as clear plastic. That would be cool. Wish me luck.
Oh... and I've decided what my next ZBrush project will be; the headpiece to the staff of Raa from Indiana Jones!!! I can't wait!
Tuesday, August 25, 2015
First ever 3D sculpt rendering!
I downloaded Blender at the advice of a friend. It's a free rendering program for 3d files. I'm planning on using it to fully render the Bird of Prey. I found a youtube video of a cup demo. It was pretty good.
Friday, August 14, 2015
Sunday, August 2, 2015
BOP: Top half of almost done!
I'm very happy with how the Bird of Prey is working out! I've learned a little bit more about insert brushes and I LOVE them! They're great for super detailed mechanical stuff. I'm making all the panel lines by duplicating the surface they're on and cutting it down with the 'Trim Curve' tool. I know there are easier, faster ways, but I demand perfectly clean lines, and no other way will give me this that I know of.
Sunday, July 26, 2015
BOP: Top half of the rear engine all done!
Monday, June 22, 2015
Tuesday, June 2, 2015
BOP: Wings are done!
Finally finished the wings. There's one more layer of detail that goes on the top and bottom of both, but I'll do that later. It's coming along pretty well so far. I can't wait to start the head of this thing!
Saturday, May 9, 2015
Bird of Prey
No, I haven't forgotten about the ZBrush Bird of Prey. In fact I've been waiting until my new office was finished to get back to it. I'm doing ZBrush in a dedicated office with hardwood floors and four windows of natural light for the first time EVER. It was well worth the wait. As you can see, I've completed the outside of the wing gun. So, this is the first finished piece of the Bird of Prey!
Fun fact: the disruptor mounts are not completely identical. They have slight differences from the left wing to the right. It's cool, since I never noticed on the studio model, but it's annoying knowing I have more work to do on the almost identical left wing.
Wednesday, March 11, 2015
PBY: Browning Machine guns
So, apparently, it is IMPOSSIBLE to find 1:18 scale .30 caliber machine guns to buy online. I decided to just scratch build the three I needed for my Catalina. They're brass, steel and styrene plastic. I can't wait to paint them! They'll clean up so nice in black!
Wednesday, March 4, 2015
Bubo from Clash of the Titans
This is my attempt at a master replica of Bubo from Clash of the Titans. He's 9" tall
and covered in real solid brass and aluminum. He's mounted to a found stick on a base. His head rotates as well. The only detail I failed to replicate are the detail lines that each breast piece is supposed to have.
Thursday, February 5, 2015
PBY: Turret
Here's the nose turret so far. Tomorrow, I'm going to cut out the windows. It's not as sloped as it should be, but I think once it's all painted and installed with windows, no one will ever notice.
Sunday, January 25, 2015
PBY
For Christmas, My brother got me a 1:18 scale PBY for my new two car garage. I'm now on a mission to accurize and detail it. First step, the cockpit.
The cockpit has inaccurate windows and no other detail. My first step was to lightly sand and fill the two panel lines, then primer out the whole thing.
I then drew on all the panel lines and window lines. I scored out all the panels and then cut out all the windows, filing them to try to get them as clean as possible.
I've added a couple detailed panels and a hatch to the top.
These are the 1st skylight window panels. I'm not happy with them. They aren't as clean as I want.
God! It's been a while!
I'm so sorry I've been away so long! We got married, had a week long honeymoon in Maui, and bought and moved into a house! I also had my birthday and celebrated Christmas with my family up north in Maryland!
But now... Back to the side projects!!!!
But now... Back to the side projects!!!!
Subscribe to:
Posts (Atom)


